

In this tutorial, we will look at how to build an in-engine chat interface where an NPC responds locally on your machine using LLMUnity.
Architecture Overview#
The system architecture consists of four distinct components working together:
LLM_GameObject(The Brain): A GameObject with theLLMscript that loads the local.ggufweights and runs inference in the background.LLMAgent(The Character): The client representation holding the agent’s character persona and system prompt. Multiple agents can connect to a singleLLMbackend.NPCController.cs(The Glue): A custom C# script handling UI events, locking input while the character speaks, and updating the text stream.ChatScrollView(The Face / UI): A responsive TextMeshPro Scroll View that dynamically displays the conversation and scrolls automatically.
Step 1: Install LLMUnity & Setup the Model Server#
- Open your Unity project (‘6000.0.x’ or later.
- Navigate to Window > Package Manager.
- Click the
+button in the upper-left corner and select Add package from git URL…. - Enter
https://github.com/undreamai/LLMUnity.gitand click Add. - Once imported, right-click in your Hierarchy and choose Create Empty. Name this object
LLM_GameObject. - With
LLM_GameObjectselected, go to the Inspector, click Add Component, and search for LLM. - In the LLM component inspector:
- Keep default settings:
Num Threads = -1(uses all CPU cores) andContext Size = 8192. - Under the model list, select and download a lightweight model like Qwen 3.5 0.8B (fast initial token latency, concise chat answers)
- Wait for the model download to complete.
- Keep default settings:
Step 2: Create the AI Character#
- Right-click in the Hierarchy and create another Empty GameObject named
AI Character. - Add the LLMAgent component to it.
- In the Inspector, ensure the Llm property references the
LLM_GameObjectcreated in Step 1. - Customize the System Prompt to define your character’s personality and interaction boundaries:
You are an AI conversational agent.
Respond naturally and briefly (1-3 sentences), as if having a real-time spoken conversation with a user testing your interface.
Do not use emojis.
Step 3: Build the Chat UI#
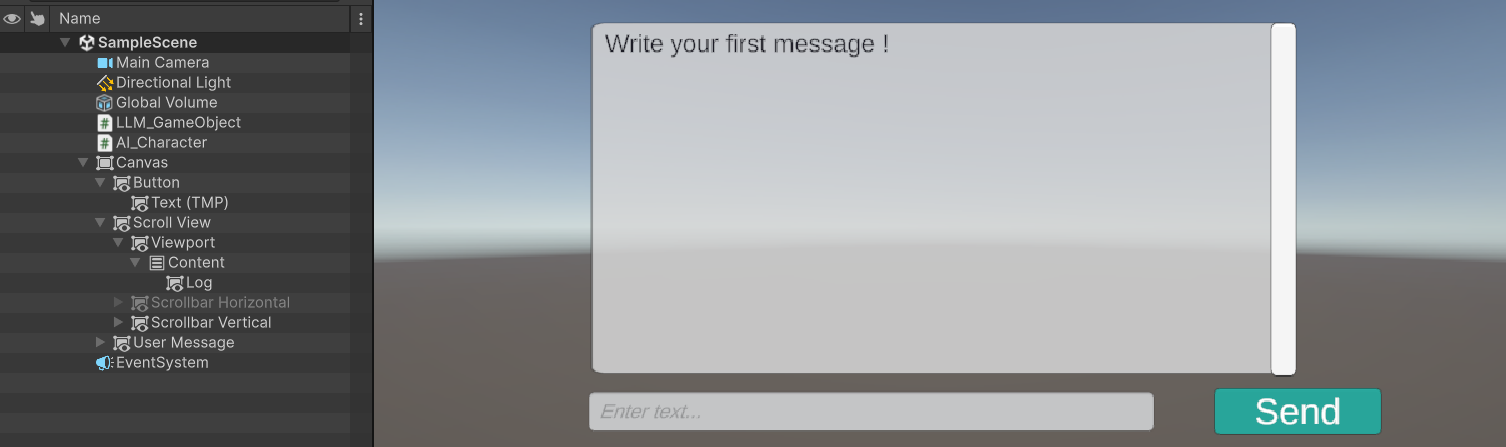
The UI Canvas hierachy should look something like this :
Canvas
├── ChatScrollView (Scroll View)
│   └── Viewport
│       └── Content (Vertical Layout Group + Content Size Fitter)
│           └── ChatLogText (TextMeshPro - Text)
├── InputField_UserMessage (TMP Input Field)
└── Button_Send (TMP Button)
Some settings have to be changed as well, so the generated text fits the window perfectly:
- Set UI Scale Mode to Scale With Screen Size and Reference Resolution to 1920 x 1080.
- ChatScrollView :
- Width: 700, Height: 300, Pos Y: 90.
- isable horizontal scrolling on the Scroll Rect component (Horizontal = unchecked).
- Content:
- Add a Vertical Layout Group (Control Child Size Width: Checked).
- Add a Content Size Fitter and set Vertical Fit to Preferred Size.
- ChatLogText:
- Enable Word Wrapping.
- Add a Content Size Fitter with Vertical Fit set to Preferred Size.
- Font Size: 24 or to liking.
Here is how it looked for me :
Step 4: Create the Controller Script#
Create a new C# script named NPCController.cs in your Assets/Scripts/ folder and paste the following code:
using UnityEngine;
using UnityEngine.UI;
using TMPro;
using LLMUnity;

public class NPCController : MonoBehaviour
{
    public LLMAgent llmAgent;
    public TMP_InputField inputField;
    public TextMeshProUGUI chatLogText;
    public Button sendButton;
    public ScrollRect chatScrollRect;

    private string fullLog = "";

    void Start()
    {
        sendButton.onClick.AddListener(OnSendClicked);
        inputField.onSubmit.AddListener(delegate { OnSendClicked(); });
    }

    void OnSendClicked()
    {
        string userMessage = inputField.text.Trim();
        if (string.IsNullOrEmpty(userMessage)) return;

        fullLog += $"\n <color=#5B6CFF><b>You: </b></color> {userMessage}\n";
        fullLog += "<color=#FF9F1C><b>AI:</b></color> ";
        chatLogText.text = fullLog;

        inputField.text = "";
        inputField.interactable = false;
        sendButton.interactable = false;

        _ = llmAgent.Chat(userMessage, HandleReply, OnReplyComplete);
    }

    void HandleReply(string replySoFar)
    {
        chatLogText.text = fullLog + replySoFar;
        // Automatically scroll to the bottom
        // Forces Unity to recalculate the UI height based on the new text first
        Canvas.ForceUpdateCanvases();

        // 0f represents the absolute bottom of the scroll view
        chatScrollRect.verticalNormalizedPosition = 0f;
    }

    void OnReplyComplete()
    {
        fullLog = chatLogText.text + "\n";
        inputField.interactable = true;
        sendButton.interactable = true;
        inputField.ActivateInputField();
    }
}
Step 5: Assign Component References#
- Select the AI Character GameObject
- Add the NPCController component to it.
- Link the inferences in the Inspector:
- Llm Agent: Drag the AI Character object (holds the LLMAgent component).
- Input Field: Drag InputField_UserMessage.
- Chat Log Text: Drag ChatLogText.
- Send Button: Drag Button_Send.
- Scroll Rect: Drag ChatScrollView.
Step 6: Try it out !#
Press Play in the Unity Editor, click into the input field, and send a message. Here is a video demonstrating the final results.
The LLM in action
Now you can play around with the different parameters available, for example the System Prompt to see how it impact the answer from the LLM Agent.